With the following tutorial you will learn the elemental basics of the Ultimate Inventory System plugin and how to create a simple inventory. It describes several steps that are essential to make the inventory system:
- Create inventory (set inventory’s basic properties),
- Design inventory (set inventory’s appearance),
- Show/Hide inventory (set up inventory to open and close – appear/disappear),
- Set item types (define what kind of items can be placed in any the of available inventories),
- Set items (create specific items and place them in any inventory),
- Remove items.
| NOTE: This tutorial assumes you know the basics of the Construct engines. In case you don’t know e.g. how to install an addon, how to add the plugin to the project, how to use local variables, how to make sub-events etc., please visit Construct.net to learn how to use the engine first. |
1. CREATE INVENTORY
The very first thing you need to do is to create inventory with [Create inventory] action. This can be for example at the start of the preloader layout. In the action’s parameters you need to put the inventory’s ID and set its size by putting an amount of Columns and Rows.

ID – this is a “name” of the inventory. Keep it simple as you may need to use it often. It needs to be unique to distinguish from other inventories. In case you create more than one inventory with the same ID, the previously created one will be overwritten.
Columns – number of slots horizontally (how many columns of slots the inventory will consist of).
Rows – number of slots vertically (how many rows of slots the inventory will consist of).
The amount of columns and rows will define the amount of item slots and affect visual dimensions of the inventory. E.g. an inventory consisting of 5 columns and 5 rows, will have 25 slots in total.
| NOTE: Ultimate Inventory System is a global plugin. This means that every inventory you create is accessible from any place in the project, therefore, each inventory needs to be created only once per game. If you trigger the “Create inventory” action at the start of a layout that is played multiple times, then the inventory will be overwritten on and on and it’s data will be erased with each creation. Due to that, for the inventory that will be used on a regular basis (e.g. player’s inventory) it is highly recommended to create that inventory in the layout that is played only once per game, e.g. a preloader layout. |
2. DESIGN INVENTORY
Once the inventory is created, you can set up how the inventory is visually presented. For this, we use [Design inventory] action.

ID – here you indicate which inventory you want to design by putting a respective inventory ID (the one you set in the [Create inventory] action)
Slot Object – select an image object that will represent inventory slots. The selected image will be automatically resized to match the dimensions of the entire inventory, so a single object will be used to display all the slots. Therefore, you can use either a Sprite that already has a size matching the entire inventory (it’s size matches the size of all slots put together), or you can use a TiledBackground representing a single slot (in such case, the tiled background will be resized to the size of entire inventory). We highly recommend using TiledBackground.
| NOTE: Regardless of the type of object you use, it’s origin point or hotspot must be in the top-left corner. |
Slot Width and Slot Height – width and height of a single slot in pixels.
| NOTE: Assuming you used TiledBackground, the Slot Width and Height should be the same as of the image you use in that TiledBackground. |
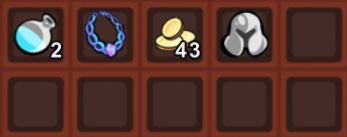
Quantity Text Object – select a text object (Text or SpriteFont) that will be displayed to indicate the amount of items stored in a slot. This is for stackable items, so those that can count more than one unit of item per slot (to be described in a further part of the tutorial). By default the text object is displayed in a bottom-right corner of each slot that contains a stackable item.
Text Offset X and Y – you can additionally put offset coordinates for the quantity text to adjust its position in relation to the slot, to make it match your game design. The 0,0 coordinate is at the bottom-right corner of each slot.
| TIP: To easily adjust the placement of the quantity text, it’s best to use a text object that has an origin (hotspot) set to bottom-right, horizontal alignment set to right, and vertical alignment set to bottom. |
Alternatively you can use [Global inventory design] action to set a default design for all the inventories present in the game.
This is useful for games where many smaller inventories can be created on the fly during gameplay, e.g. some random loot bags dropped by defeated enemies or containers like chests, crates etc.
This action needs to be triggered only once for the entire project and it does not require any inventory to exist. However, for a specific inventory you can override the design by a regular [Design inventory] action. In other words, you can use Global inventory design to set up a default appearance of the inventories and have a dedicated design for more crucial inventory like the player’s inventory.
3. SHOW/HIDE INVENTORY
By default, every inventory is not visible in any way (is hidden). In order to make it visible (along with contained items) you need to use [Show inventory] action.
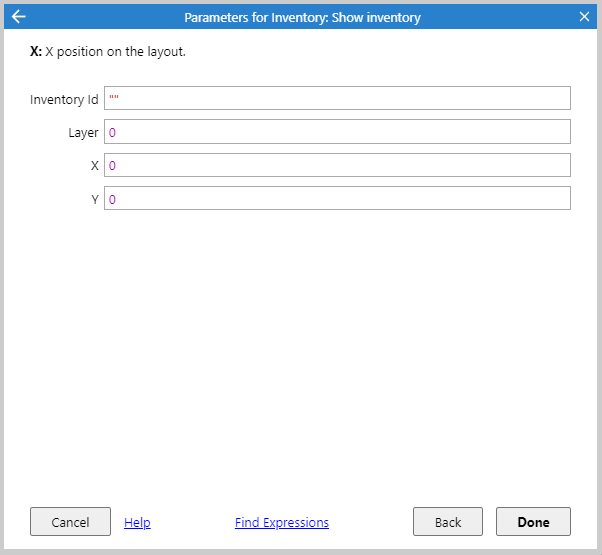
Inventory Id – name of the inventory you want to show. Same you provided in the Create inventory action.
Layer – Layer on which the inventory should be shown.
X and Y – coordinates of the inventory on the indicated layer. Note that the origin of the inventory is in it’s top-left corner.
To make it invisible again use [Hide inventory] action. This action requires only to provide inventory ID.
TIP: The most common type of an inventory most of the developers will make is the player’s inventory. It is also very common to open and close that inventory by pressing a specific key (e.g. “I”). If you want make it like this, you can use [Is inventory shown] condition to easily close and open inventory as in the snapshot below:  |
4. SET UP ITEM TYPES
Once the inventories are created and designed, we need to specify what kinds of items (item types) can be placed in the inventories. For this you need to use [Create item type action].

| NOTE: In the Ultimate Inventory System there are two different actions that may seem to be similar: [Create item type] and [Create item]. Item type is a “definition” of an item that can appear in the game. In order to create an item and place it in an inventory, first you need to create its type. This particular paragraph describes how to configure item types by the [Create item type] action. The next paragraph describes how to create specific items with [Create item] action. |
Type – a string that serves as a name of the type, e.g. “weapons”, “armors”, “accessories” etc.
Icon – an image object, preferably sprite, that will visually represent items of that type in the inventories. It’s best if every sprite used as an icon has the origin point set in the middle and the collision polygon set to match the entire sprite or even match the size of the slot. This way it will be easier to operate with items in inventories using a mouse or touch.
Max Stack – maximum number of items that can be stored in a single slot. If you put a value higher than 1, the items of the same type will be present by a single icon accompanied by a quantity text object selected in the [Design inventory] action. This is a suitable solution for smaller items like gold, jewels, ingredients, ammunition or some consumables.
Destroy At Stack 0 – set if the item is automatically removed from the inventory if it’s quantity drops to 0. In the majority of cases you will keep it set to “Yes”, but there are some designs where turning it off may come handy.
Same as inventories, each item type needs to be created only once per game. Therefore, the best is to do it along with the [Create inventory] in some preloader layout.

5. SET UP ITEM CREATION
Once item types are ready, you can start creating items. For this you use [Create item] action.

Type – here you need to indicate what type the item you want to create will be. Obviously it needs to be one of the item types you created before.
Quantity – amount of items you want to create. NOTE: This is for stackables items only, so those that have Max Stack set higher than 1. If you change this value for an item that is not stackable, only one item will be created anyway. In case you need to create more than one non-stackable item, you need to repeat this action accordingly.
Inventory Id – ID of the inventory where the item will be placed upon creation. Note that none of the items handled by the plugin can’t be placed “nowhere”. Every single item needs to be in an inventory. Otherwise, the item simply does not exist.
Slot Id – ID of the slot where you want the item to be put in. If you leave it empty (by putting a double quotation mark, as per default value) the item will be automatically placed in the first empty slot.
| NOTE: IDs of slots are set automatically by the plugin. In case you want to place an item in a specific slot, you will need to use one of the dedicated plugin expressions. This is needed if you want to implement a possibility to drag and drop items between slots and inventories. |
There are plenty of ways you may want to create an item. For the purpose of learning the plugin, just make events where items are created by clicking a dedicated button made of sprites, similar to how it’s done in the majority of example projects attached to the plugin.

| NOTE: Regardless if the inventory is visible or not, the items can be added as well as removed or manipulated in other ways. |
6. SET UP ITEM REMOVAL
Every existing item can be removed and there are two major ways to do this:
- by destroying the item with [Destroy item] action,
- reducing it’s quantity with [Set item quantity] action.
The most common way the players operate with inventory items is by mouse. Therefore, let’s make the items destroyed if you click with a right mouse button.

Method A – Destroy items
The [Destroy item] action requires just one information – the item ID. So the ID of a specific item we want to remove.
Same as inventory slots, the item IDs are assigned automatically by the plugin. To retrieve the Item’s ID we will use dedicated Inventory expressions – ItemIdByIconUID.
This expression retrieves an ID of an item based on the Unique ID (UID) of the icon object representing the item. In other words – UID of the item’s sprite.

| TIP: The examples above use an object family that consists of all the sprites used for icons of items. Using families for item sprites is a good practice. This way you will easily and efficiently operate with your items. |
Method B – Reduce item quantity
The [Set item quantity] needs two information – item ID and quantity.
For the item ID you can use the same expression as in the first method – ItemIdByIconUID.
In order to properly set the desired quantity of items (reduced by 1) you need to use another expression – ItemQuantity. This expression needs a parameter, which is item ID. Therefore, you can put the ItemIdByIconUID expression (same as you have put in the Item Id parameter of the action).


| NOTE: Keep in mind that this method (to remove items by quantity reduction) requires all item types to have “Destroy at stack 0” option turned “Yes”. |